QBench administrators can enforce Multi-Factor Authentication (MFA) via email, Google Authenticator, or Authy (Twilio) for all of their LIMS Users who login using an email and password. QBench LIMS Users without an instance-wide MFA policy and Customer Portal Users who login with an email and password can also voluntarily enable MFA for their QBench account. This article will explain the process for enabling MFA for all LIMS Users, and how individual LIMS and Customer Portal Users can enable MFA when it is otherwise not required.
Enforcing MFA For All LIMS Users
Turning On MFA
- Login to your QBench instance as an administrator
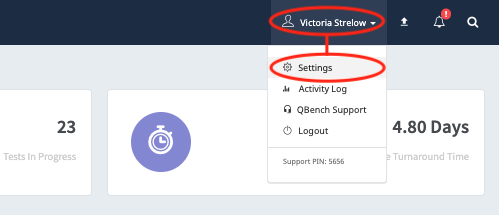
- Click your name in the top right corner of the screen, then click "Settings"
- On the User Settings page, click the "Users" tab
- On the Users tab, click the checkbox next to "Enforce Multi-Factor Authentication for all users who login with an email and password". A success message will appear in the top right corner of the screen
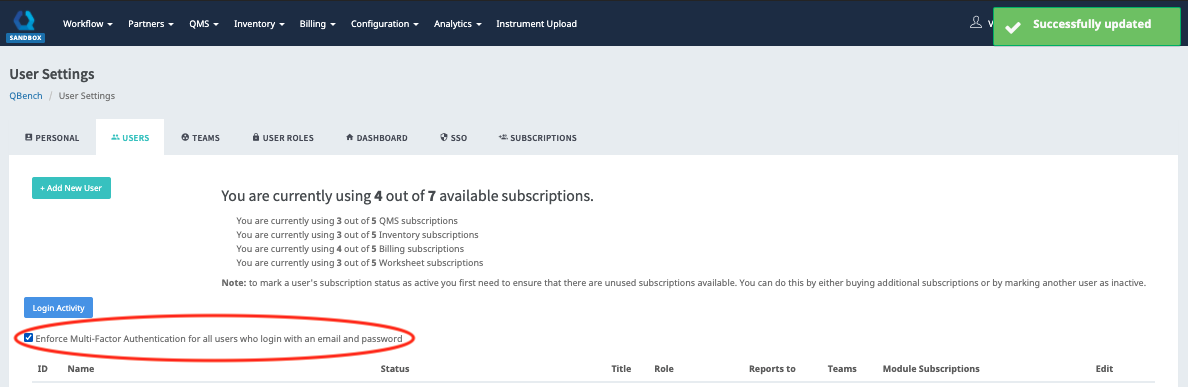
- Once this box is checked, all LIMS Users who login to QBench using an email and password will be required to set up MFA. Users will be unable to turn off MFA unless this setting is disabled. Users who access QBench via SSO will not be affected by QBench's MFA setting -- MFA for these Users would need to be enabled through your SSO provider
Setting Up MFA Once Enforced In The LIMS
Once MFA is enforced across QBench, LIMS Users are required to set up MFA via email or an approved authenticator application. If a User does not set up MFA, they will be unable to go beyond the User Settings page
Email MFA
1. To set up MFA via email, click the radio button next to "Email"
2. Click the "Yes" button to confirm wanting to set up MFA via email -- clicking "Yes" will cause a modal to appear asking for your first MFA code
3. Check the inbox of the email associated with your QBench account for an email from QBench Information. If you do not see an email from noreply@qbench.net within 1-2 minutes, check your Spam folder
4. Open the email. Enter the code from the email in the MFA modal in QBench and click the "Confirm" button
5. If the code is correct, a success message will appear, and your MFA setup is complete! You will have the option to switch from email MFA to authenticator app MFA, but you will be unable to disable MFA
Authenticator App MFA
1. To set up MFA via authenticator application, click the radio button next to "Authenticator App"
2. A modal will appear with instructions to set up MFA using an approved authenticator app -- QBench currently supports Google Authenticator and Authy (Twilio). If you have not already, you will need to download one of these authenticator apps on your mobile device to proceed
3. Follow the prompts on the modal. For step 4 on the modal, you will need to wait for two code cycles, and enter the codes in order. Once you have entered the two most recent codes from the authenticator app, click the "Verify" button
4. If the codes are correct, a success message will appear, and your MFA setup is complete! You will have the option to switch from authenticator app MFA to email MFA, but you will be unable to disable MFA
Voluntarily Enabling MFA
LIMS Users
Even if MFA is not enforced across QBench, individual Users can voluntarily enable MFA via email or authenticator app. Follow the Email MFA or Authenticator App MFA sections for instructions.
Customer Portal Users
- Login to the Customer Portal
- Click on your name in the top right corner of the screen, then click "User Settings"
- Follow the Email MFA or Authenticator App MFA sections, as applicable, for instructions
Disabling MFA
If you voluntarily enabled MFA or if your organization no longer requires mandatory MFA, you can choose to disable MFA.
- Login to either the LIMS or the Customer Portal
- Click on your name in the top right corner of the screen, then click "Settings" or "User Settings"
- Click the "Disabled" radio icon
- Click the "Yes" button to confirm wanting to disable MFA
- A success message will appear in the top right corner of the screen, and your MFA will be disabled
Comments
0 comments
Please sign in to leave a comment.